How to fit logo and entrance mats in a matwell or recessed area.
How to fit textile logo and entrance mats in a matwell or recessed area.
Equipment:
Tape measure, Stanley Knife, Chalk, Pencil, Straight Edge, Glue, Screed / Marine Plywood, Matwell Frame
- Prepare your matwell.
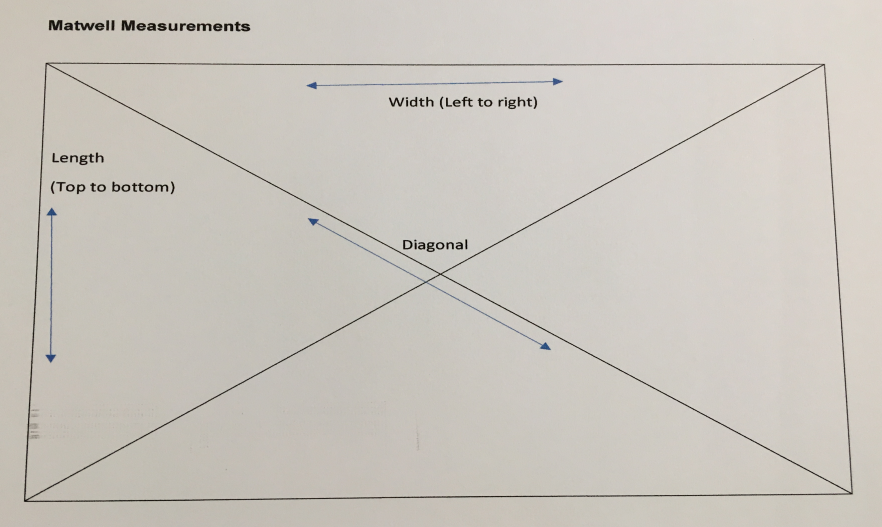
- Measure your matwell in mm, length x width, then measure crossways on the diagonal, top left corner to bottom right corner and repeat on the opposite diagonal. This method will highlight if your recessed matwell shape is square or slightly rhomboid/ skewed.
- A matwell frame should be fitted around the perimeter of the well to protect the edges of the mat and present a professional finished look.
- Measure the depth of your recessed well. If it is deeper than your mat depth, a layer of screed or marine plywood will be required to bring the mat to floor level when fitted. Allow the screed to completely dry before placing the mat in the well. Ensure door clearance is considered, if applicable.
- Order your logo mat.
- Logomatworks will work with you every step of the way from your initial contact. Our friendly helpful team can provide advice regarding measurements, logo design and colour tones. Artwork proofs are also available where a logo or design will be placed on the mat.
- Fitting your mat.
- Once you receive your mat, unwrap and allow the mat to lie flat and rest for a while at room temperature.
- When you are ready to fit, reverse the mat, mark your precise measurements on the back of the mat to form a template, ready for cutting. The skills of a local carpet fitter are recommended for a professional fit.
- If your mat has a logo or design on the front of the mat and you want to ensure your logo is positioned in the centre of the well, place your mat on top of the frame with the logo facing you and position your mat into the preferred position.
- Next, lift one side of the mat carefully and chalk the top inside of the frame and allow the chalk dust to transfer onto the underside of the mat when you carefully lay the side down again. Repeat for the 4 sides and lift the mat off carefully again. Use the chalk markings to check your measurements and finish marking the back of the mat into a template ready for cutting.
- Use a sharp Stanley knife to cut from the back of the mat, ensure to protect the surface under the mat prior to cutting.
- Finally, spread F3 flooring adhesive on the base of the well and fit your new mat snugly into place.
Read Next


How to choose the best floor mats for your organisation.
When deciding to purchase a commercial floor mat for your business, it makes sense to ensure that it will be fit for purpose. It will be...
WHAT TYPE OF FLOOR DO YOU HAVE?
Wood, carpet, tile, laminate, other?
Our logo mats and entrance floor mats can be smooth or gripper backed to suit any floor type. Available in 100% n...
Looking to display your logo, brand or crest on an entrance floor mat.
Look no further.
The process is very simple and Logomatworks friendly and helpful sales team will guide you through the p...
Categories
Most Recent